
Candles making is one of the favorite topic when it comes to DIY stuff. People love to make things that can be gifted to others on various occasion. These candles can also be used as a decor item in your house to make it more attractive. Therefore it is always useful to learn how candles can be made easily at home. Here we are going to see how to make candles from crayon. Normally we use wax flakes for making candles at home, but using crayon for candle making can be yet another interesting way of making candles.
How to make crayon candles at home?
So, lets see how we can make candles from crayon at home in a step by step process. I hope you have already collected the old crayons lying your house in one box. So let us start with the steps.
Also Read: How to make scented soy candles – Soy Scented Candles
Process to make crayon candles at home step by step
:
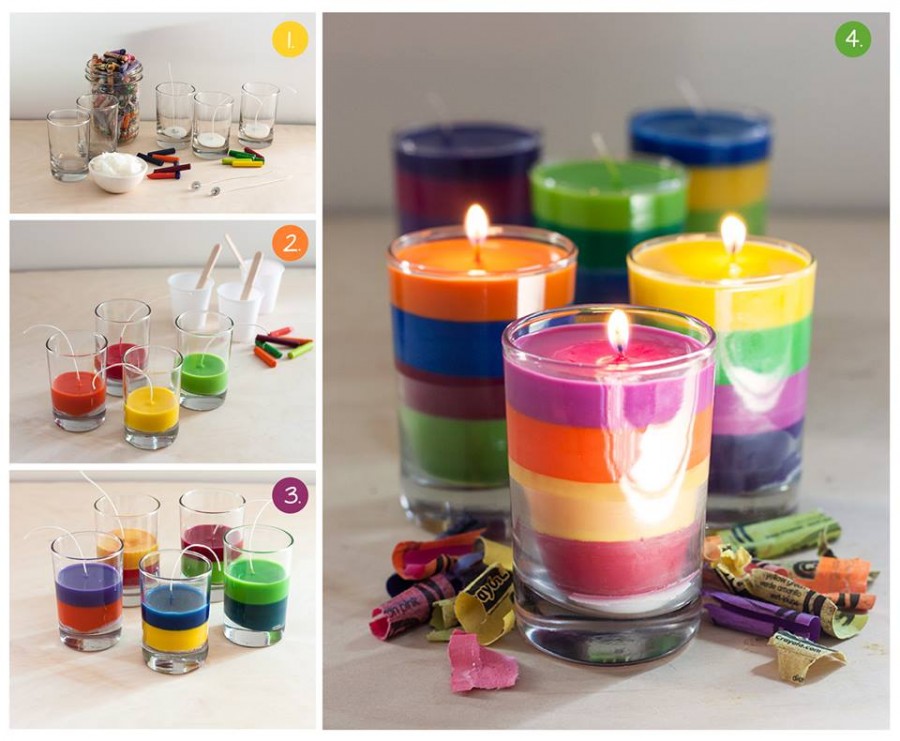
Step 1: Choosing and unwrapping the crayons
Either you can use a knife to peel of the wrapper or you can use water for making the unwrapping easier. If you are able to peel off with the knife, try to remove the wrapper. If you find it hard, than you need a cup of water. Add some ice cubes to it. Put the crayons in the water and let it remain there for 5-10 mins. After 10 mins, you take the crayons at type to remove the paper. Here you can snap the crayon in the middle, and try to take off the wrapper from the point where the paper is slightly above the crayon.
I hope using either of the way, you can easily remove the wrapper from the crayon.
Step 2: Melting the crayon
Once you have unwrapped the crayon, the next step is to put the crayon in the melting jar. Here i would suggest you to take some 12-15 crayon of your selected color and put them in the jar. Place the Jar in the microwave and wait for 2-3 mins until the crayon melts properly. Once you see the crayons look smooth, you don’t need to wait to pour the crayons in the mold once they are melted, because the wax will start to set up very fast.
Step 3: Molding the Wax and Crayons
Once the crayons and the wax is ready for pouring in the mold vessel. Here for the molding vessel, you can use glass vessel or cup shape vessel of your choice. Once you have poured the mixture of wax and crayon, wait for some time. After 2-3 mins, you can set up the candle wick. make sure you set the candle wick before the Harding of the mixture.
Step 4: Setting up the candle wick
As we said above, we have to make sure we set the candle wick before the wax solidify. While selecting the candle wick for the crayon candle, there are certain points to make sure. The size of the candle wick should slightly bigger than the dept of the candle mold or the vessel. For example, you can take a candle wick whose size is 1 to 1.5 inch bigger the dept of the vessel. If the size of the wick is smaller than it will not be reach the bottom of the vessel, and at the end we will have some portion which is not burned, this will lead to wastage of our wax.
Also Read: How to make candle wax at home – Making candle wax
Step 5: Finishing the candle
Once the wick is inserted correctly, you can leave the candle for some hours, say 4-5 hours so that it becomes hard and solid. Once the crayon candle becomes hard as desired, you can use a spoon or some pointed item to slide the candle out of the vessel or the cup. You can use the candle as it is in the cup or the vessel.
So this is how we can make crayon candles at home easily in step by step process. I hope you can try making crayon candles at home and use it for decorating your living space or use it for gifting to your family and friends.
Related searches: Making crayon candles, make crayon candles, crayon candle making, homemade crayon candles, how to make crayon candles, make crayon candles easily, make crayon candles step by step, make crayon candles at home step by step


